|
|
When I was in second grade my family took a summer vacation to Springfield. Somewhere along the way we stopped at an Amish settlement. We ate the most amazing yeasted doughnut I have ever had. It was the largest doughnut I had ever seen and it was so fluffy, sweet, and delicious. Sold for a mere 25 cents each. I can remember the Amish women in their bonnets glazing the doughnuts and then putting them on a dowel to set the glaze....My family still talks about these doughnuts 19 years later. 
On Saturday night C and I made the dough for these doughnuts. We both agreed we wanted to make them BIG, just like the Amish doughnuts I remembered from my childhood. We also agreed that even if the recipe was a flop, that they would be still better than the stale doughnuts from our local Dunkin' Donuts and for that reason we knew we had nothing to lose. In the morning we let them rise, cut them out, fried, and glazed them. A very memorable breakfast to say the least. Fluffy, sweet, buttery goodness, if I had an Amish ancestor he or she would be proud. Best eaten the day they are made along with a glass of milk. Enjoy!   Yeast Doughnut Recipe Yeast Doughnut Recipe
By: Alton BrownSource: Foodtv.comIngredients - 1 1/2 cups milk
- 2 1/2 ounces vegetable shortening, approximately 1/3 cup
- 2 packages instant yeast
- 1/3 cup warm water (95 to 105 degrees F)
- 2 eggs, beaten
- 1/4 cup sugar
- 1 1/2 teaspoons salt
- 1 teaspoon freshly ground nutmeg
- 23 ounces all-purpose flour, plus more for dusting surface
- Peanut or vegetable oil, for frying (1 to 1/2 gallons, depending on fryer)
Directions Place the milk in a medium saucepan and heat over medium heat just until warm enough to melt the shortening. Place the shortening in a bowl and pour warmed milk over. Set aside. In a small bowl, sprinkle the yeast over the warm water and let dissolve for 5 minutes. After 5 minutes, pour the yeast mixture into the large bowl of a stand mixer and add the milk and shortening mixture, first making sure the milk and shortening mixture has cooled to lukewarm. Add the eggs, sugar, salt, nutmeg, and half of the flour. Using the paddle attachment, combine the ingredients on low speed until flour is incorporated and then turn the speed up to medium and beat until well combined. Add the remaining flour, combining on low speed at first, and then increase the speed to medium and beat well. Change to the dough hook attachment of the mixer and beat on medium speed until the dough pulls away from the bowl and becomes smooth, approximately 3 to 4 minutes. Transfer to a well-oiled bowl, cover, and let rise for 1 hour or until doubled in size. On a well-floured surface, roll out dough to 3/8-inch thick. Cut out dough using a 2 1/2-inch doughnut cutter or pastry ring and using a 7/8-inch ring for the center whole. Set on floured baking sheet, cover lightly with a towel, and let rise for 30 minutes. Preheat the oil in a deep fryer oor Dutch oven to 365 degrees F. Gently place the doughnuts into the oil, 3 to 4 at a time. Cook for 1 minute per side. Transfer to a cooling rack placed in baking pan. Allow to cool for 15 to 20 minutes prior to glazing, if desired.
Doughnut Glaze By: Alton Brown
Source: Foodtv.com Ingredients - 1/4 cup whole milk
- 1 teaspoon vanilla extract
- 2 cups confectioners' sugar
Directions Combine milk and vanilla in a medium saucepan and heat over low heat until warm. Sift confectioners' sugar into milk mixture. Whisk slowly, until well combined. Remove the glaze from the heat and set over a bowl of warm water. Dip doughnuts into the glaze, 1 at a time, and set on a draining rack placed in a half sheet pan for 5 minutes before serving.
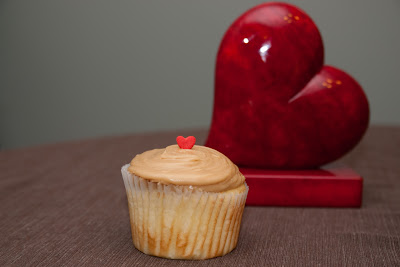
.............and the way to the heart is through the stomach.Christopher and I made a southern style dinner to celebrate our first Valentine's Day as a married couple. We had an amazing time cooking together in the kitchen. This was the first time we made corn oysters, a fried puff of corn batter. They have an amazing tender and delicate consistency with a dynamite fresh corn and salty flavor. We wondered why this side dish isn't more popular, way tastier than hush puppies (and I like hush puppies!) The fried catfish was very good but I didn't post a recipe for it since I want to try making a batter that has a spicier seasoning mix (I also enjoy the Zatarain's fish fry breading.) We also planned to serve a vegetable as a side but opted to cook it the next day instead to save some room. For dessert we made a southern specialty into jumbo cupcakes- Buttermilk-Caramel Cake. The tang of the buttermilk cake is well balanced by the sweetness of the frosting. A glass of milk is welcomed as an accompaniment here.
 Corn Oysters Corn OystersRecipe from America's Best Lost Recipes CookbookServes 6 - 4 medium ears corn, husks and silks removed (make sure to use fresh corn, frozen or canned is too dry to produce a creamy batter)
- 1/2 cup all-purpose flour
- 1/4 cup cornstarch
- 4 large eggs
- 1/2 teaspoon salt, plus extra for sprinkling
- 1/4 teaspoon baking powder
- 2 quarts vegetable oil
- Grate the kernels from the corn into a medium bowl using the large holes of a box grater. Using the back of a knife, scrape any pulp remaining on the cobs into the bowl with the grated corn. Stir in the flour, cornstarch, eggs, salt, and baking powder until well blended.
- Heat the oil in a dutch oven (large pot) (or us a deep fryer) over medium heat until it registers 350 degrees. Carefully drop 13 to 15 heaping tablespoons of batter into the hot oil and fry, turning once, until the corn oysters puff and are golden brown on both sides, about 2 minutes. Transfer to a paper towel-lined plate. Add more oil to the pot if necessary and heat to 350 degrees. Repeat with the remaining batter. Sprinkle the corn oysters with salt. Serve immediately.
 Buttermilk-Caramel Cake Buttermilk-Caramel CakeRecipe from America's Test Kitchen Baking Book Cake- 2 3/4 cups (11 ounces) cake flour
- 2 teaspoons baking powder
- 3/4 teaspoons salt
- 16 tablespoons (2 sticks) unsalted butter, softened
- 1 3/4 cups (12 1/4 ounces) granulated sugar
- 4 large eggs (room temperature)
- 1 tablespoon vanilla extract
- 1 1/2 cups buttermilk, room temperature
Caramel Frosting- 8 tablespoons (1 stick) unsalted butter
- 1 cup packed (7 ounces) dark brown sugar
- 1/4 cup whole milk
- 2 cups (8 ounces) confectioners' sugar
- 1 teaspoon vanilla extract
- For the cake: Adjust an oven rack to the middle position and heat the oven to 350 degrees. Grease an 13 by 9-inch baking pan, then line the bottom with parchment paper. Whisk the flour, baking powder, and salt together in a medium bowl.
- In a large bowl, beat the butter and granulated sugar together with an electric mixer on medium speed until light and fluffy, 3 to 6 minutes. Beat in the eggs, one at a time, until combined, about 30 seconds. Beat in the vanilla.
- Reduce the mixer speed to low and beat in one-third of the flour mixture, followed by half of the buttermilk. Repeat with half of the remaining flour mixture and the remaining buttermilk. Beat in the remaining flour mixture until just incorporated.
- Give the batter a final stir with a rubber spatula to make sure it is thoroughly combined. Scrape the batter into a prepared pan, smooth the top, and gently tap the pan on the counter to settle the batter. Bake the cake until a toothpick inserted in the center comes out with a few moist crumbs attached, 25 to 30 minutes, rotating the pan halfway through baking.
- Let the cake cool completely in the pan, about 2 hours. Run a paring knife around the edge of the cake and flip the cake out onto a wire rack. Peel off the parchment paper, then flip the cake right side up onto a serving platter.
- For the Frosting: Bring the butter and brown sugar to a boil in a medium saucepan over medium heat, stirring constantly, until the sugar is dissolved and the mixture is foamy, 3 to 5 minutes. Whisk in the milk, return the mixture to a bried boil, then remove from the heat. Stir in the confectioners' sugar and vanilla with a wooden spoon and beat the frosting until smooth, 2 to 3 minutes. Spread the warm frosting evenly over the surface of the cooled cake and let set, about 25 minutes, before serving.

Hope you had a great Valentine's Day!!!
Pumpkin Banana Orange Bread
My Mom makes this awesome dessert at Thanksgiving called Pumpkin Banana Mousse Tart. It combines the wonderful flavors of pumpkin, banana, and orange. I wanted to capture this unique flavor combination in a food I can eat more frequently. This combination proved to be a delicious and moist breakfast bread. Enjoy!  The Recipe The Recipe
Pumpkin Banana Orange Bread2 cups all-purpose flour
3/4 cup sugar
3/4 tsp baking soda
1/2 tsp salt
1/2 15 oz can pure pumpkin
3/4 cups mashed very ripe bananas (approx 1.5)
6 tbsp unsalted butter, melted and cooled
2 large free range eggs
1/4 cup whole yogurt
1 tsp vanilla extract
1.5 tsp orange zest
- Pre-heat oven to 350 degrees F with rack in lower-middle position.
- Spray a 9″ x 4″ loaf pan with non-stick spray.
- Combine the flour, sugar, baking soda, salt , and orange zest with a whisk in a large bowl.
- Combine the mashed bananas, pumpkin, butter, eggs, yogurt and vanilla extract in another bowl.
- Gently fold the banana/pumpkin mixture into the flour mixture, being sure not to over mix.
- Place the batter in loaf pan and smooth over the top.
- Bake about 55 minutes or until a toothpick comes out clean from the center.
- Let cool 10 minutes, then turn out onto a wire rack and let cool 1 hour.
Check out these pictures of the snow on my driveway this morning! I live in the Chicagoland area, and last night we were hit with the Great Mid-West Ground Hogs Day Snow Storm! It is the third largest snow storm in Chicago History. Entire counties in my area have closed all of their roads, most businesses are closed, most people are home bound, and some unfortunate individuals are stranded on roads awaiting the arrival of the National Guard. As for me? I am seizing the opportunity today to do what I love best, bake! It's been a while since my last post, a year and 5 months to be exact. My excuse? I was planning my wedding. Now that I'm a happily settled in newlywed and more importantly my husband/blog site photographer (we are both supposed to put the other first, right?) is also a happily settled in newlywed I am ready to blog again. My wonderful husband Christopher got me the America's Test Kitchen Baking Book as a Christmas present and I will be spending my snow day utilizing it. Starting with last night- I made some Light Chocolate Chip Cookies. Only 1/2 stick of butter for a 2 dozen cookie recipe! Not bad for being light cookie; so soft and chewy! These cookies come together in no time; a much improved method from Test Kitchen's previous Light Chocolate Chip Cookie Recipe which required making a time consuming cooked date puree. This will definitely be my go-to Chocolate chip cookie recipe for home and family use but I will still pull out the big guns and use Test Kitchen's Thick and Chewy Chocolate Chip Cookie recipe for parties and get-togethers.  Light Chocolate Chip Cookie Recipe: Light Chocolate Chip Cookie Recipe:- 1 1/4 cups all-purpose flour
- 1/4 teaspoon baking soda
- 1/4 teaspoon salt
- 4 tablespoons (1/2 stick) unsalted butter, melted and cooled
- 1 large egg
- 2 teaspoons vanilla extract
- 1 cup packed light brown sugar
- 4 ounces semisweet chocolate chips (a generous half cup)
- Adjust an oven rack to the middle position and heat the oven to 350 degrees. Whisk the flour, baking soda, and salt together in a medium bowl and set aside.
- In a large bowl, whisk the butter, egg, and vanilla together. Stir in the brown sugar until smooth, smearing any remaining clumps of sugar against the side of the bowl. Stir in the flour mixture and 3 ounces (a generous 1/3 cup) of the chocolate chips until thoroughly combined.
- Working with a level tablespoon of dough at a time, roll the dough into 1-inch balls. Lay the balls on two parchment-lined baking sheets, spaced about 2 1/2 inches apart. Press the remaining chips in to the top of the dough (2 or 3 chips per cookie).
- Bake the cookies, one sheet at a time, until the edges are light golden and the centers are just set, 9 to 11 minutes, rotating the baking sheet half-way through baking (do not over bake). Let the cookies cool on the baking sheet for 5 minutes, then serve warm or transfer to a wire rack and let cool completely. Bake the second sheet while the first sheet cools.
Then this morning Christopher and I made "Simple Spice drop doughnuts" and "Simple Orange doughnuts" for breakfast while we watched the snow fall and contemplated plowing it. We used our Waring Pro Deep Fryer however a candy thermometer and a large pot will work well too. My deep fryer has been sitting on the kitchen counter slowly trying to seduce me ever since Christopher took it out to make homemade onion rings for his birthday over two weeks ago and today I finally caved under its gentle lure. Doughnut batter is a simple as making pancake batter and the doughnuts only take 3-6 minutes to fry. If you make the doughnuts into uniform balls they will even flip themselves over automatically when the first side is done cooking. How amazing is that?! Perhaps doughnuts will become my official replacement for pancakes. We rolled our doughnuts in a "orange" zest sugar (we only had a tangerine on hand so we substituted it in for the orange) and a cinnamon, nutmeg, all spice sugar. The interior of the doughnuts is so tender and a glass of milk is the perfect accompaniment. Eating these doughnuts reminded me of what a doughnut is and should always be. Lately I've been wearied by the stale, lackluster Dunkin' Donuts variety and not even Krispy Kreme has been what it used to be- Oh the memories of the Krispy Kreme glory days of the 90's.     Simple Drop Doughnuts Recipe: Simple Drop Doughnuts Recipe:- 2 cups all-purpose flour
- 2 tsp. baking powder
- 1/4 tsp. salt
- 1.2 cup granulated sugar
- 2 large eggs
- 1 tsp. ground nutmeg
- 1/2 cup whole milk
- 2 tablespoons unsalted butter, melted and cooled
- 1/2 tsp vanilla extract
- 2 quarts vegetable oil
- Spice Drop Doughnuts variation: Combine 1/2 cup sugar, 1 tablespoon ground cinnamon, 3/4 teaspoon ground nutmeg, and 1/2 teaspoon ground all-spice together in a medium bowl to make a spice sugar; set aside. Add 1 1/2 teaspoons ground cinnamon and 1/4 teaspoons ground all-spice to the doughnut batter. Roll the fried, drained doughnuts in the spice sugar before serving.
- Orange Drop Doughnuts variation: Pulse 1/2 cup sugar and 1 teaspoon grated fresh orange zest together in a food processor to make an orange sugar; set aside. Substitute 1 tablespoon grated orange zest for the nutmeg, and 1/2 cup orange juice for the milk. Roll the fried, drained doughnuts in the orange sugar before serving.
- Whisk the flour, baking powder, and salt together in a medium bowl. In a separate medium bowl, whisk the sugar, eggs, and nutmeg together until smooth, then whisk the milk, melted butter, and vanilla until combined. Stir the egg mixture into the flour mixture with a wooden spoon until evenly combined.
- Heat 3 inches of vegetable oil in a Dutch oven over medium-high heat until it reaches 350 degrees. Using two spoons, scoop out a Ping-Pong ball-sized portion of batter and carefully scrape the batter into the hot oil. Repeat about 5 more times and fry the doughnuts until they are crisp and browned on all sides, 3 to 6 minutes, adjusting the heat as necessary to maintain the oil at 350 degrees.
- Using a slotted spoon, transfer the fried doughnuts to a paper towel-lined baking sheet and let drain while repeating with the remaining batter. Roll in sugar and serve warm.
This evening I also made "Almost No Kneed Bread," from the cookbook. Pictures from the camera haven't yet been uploaded but be sure to check back soon! Stay warm!
 The strawberries in the grocery stores are finally sweet, not to mention on sale. Here's one way to use them. You will need a 1 lb. container of strawberries to make these delicious cupcakes. The strawberry frosting was amazing, creamy, tangy, and packed with fresh strawberry flavor. Next I want to use the strawberry frosting on homemade banana cupcakes! Mmmm strawberry banana....  Strawberry Cupcakes: Strawberry Cupcakes:
Compliments of Good Things Catered
2 1/2 c. cake flour 1 tsp baking soda 1/4 tsp salt 1/2 c. unsalted butter 1 1/2 c. sugar (minus one heaping tablespoon) 2 eggs 1/3 c. buttermilk 1/4 c. oil 1 tsp vanilla extract 2 c. chopped strawberries Directions: -Preheat oven to 350 degrees and prepare 2 cupcake pans. -Sift flour, salt, and baking soda in medium bowl. -In bowl of mixer, cream butter and sugar until fluffy. -Add eggs one at a time until combined. -Add buttermilk, oil and vanilla until combined. -Add flour mixture and stir until just combined. -Fold in berries. -Fill cupcake pans 3/4 way. -Bake for 20 minutes.  Strawberry Frosting: Strawberry Frosting:1/4 c. strawberries 1 Tbsp. strawberry liquor (I used strawberry extract) 1/2 tsp lemon juice 8 oz. cream cheese, room temp 1 1/2 sticks unsalted butter, room temp 1 3/4 c. powdered sugar 1/2 Tbsp vanilla -For frosting, put berries, extract/liquor, and juice in saucepan. -Bring to a boil over medium heat and then reduce to a simmer for 5 mins. -Let cool then blend until smooth. -In bowl of mixer mix cream cheese and butter until creamy. -Add sugar, then vanilla. -Add berry puree (after cooking I pureed in the blender) until smooth. -Frost cupcakes when they are completely cooled.  If you are low on time, I'd recommend making the frosting and buying a Duncan Hines Cake Mix. (While i'd never dream of using canned frosting, cake mixes are usually a good product.) Duncan Hines mixes have been rated the best cake mix brand and are always guaranteed to be fluffy and moist. I'd stick to their basic Devil's food and Yellow cake mixes because some of their flavored mixes have a very artificial taste. If you want to add other flavors to the basic mix, recipes from the Cake Mix Doctor should do the trick.
|
|


